
When you’re running an eCommerce store, data is essential. You know what they say – knowledge is power. And when it comes to WooCommerce analytics, data gives you the knowledge to figure out what’s working and what’s stopping people from making a purchase.
But getting that data isn’t always easy, in part because WooCommerce doesn’t ship with an especially detailed report/analytics system in the first place.
To help, we’ve created this in-depth WooCommerce analytics guide. You’ll learn how to:
- Set up WooCommerce Google Analytics tracking the right way, including the must-use Enhanced Ecommerce functionality (yes, you should do more than just add the universal analytics tracking code).
- Implement Facebook Pixel WooCommerce tracking to aid your Facebook marketing efforts and enable Facebook retargeting.
- Get access to better reporting than the built-in WooCommerce reports, to analyze what’s happening with specific products and customers.
Let’s dive in, starting with WooCommerce Google Analytics Enhanced Ecommerce tracking.
#WooCommerce Google Analytics Setup: You Want Enhanced Ecommerce Tracking
Most people know about Google Analytics for its universal tracking. That’s the stuff that tells you:
- Which pages people visit
- Where people come from
- Which devices they’re using etc.
Human vs Bots Website Traffic—not all website traffic is equal
The distribution between the number of bots and the number of real people visiting your site is reflected by the quantity of crawlers registered, which is usually an alarming sign.
And don’t get us wrong – that basic data is certainly helpful for an ecommerce store. But there’s also another feature of Google Analytics that’s built just for ecommerce stores called Enhanced Ecommerce.
You still get access to all that important universal analytics data, but when you enable this functionality, you can also see shopping-specific actions like:
- Product page views
- Adding or removing products from the shopping cart
- Initiated orders (they start the order process)
- Abandoned orders (they start the order process but don’t actually complete it)
- Completed orders (they actually pay for their order)
You don’t need us to tell you how incredibly helpful knowing that information is, right?
To help you get up and running with WooCommerce Google Analytics tracking:
- We’ll first quickly show you how to add the universal tracking tag to your WordPress store.
- Then, we’ll show you how to set up Google Analytics Enhanced Ecommerce tracking for WooCommerce.
If you already have the basic Google Analytics tracking code set up, click here to skip straight to the Enhanced Ecommerce section.
#How to Add Universal Google Analytics Tracking to WooCommerce
If you’re comfortable working with code, you can always add the Google Analytics tracking tag directly to your site’s header using a child theme. We’re going to show you how to do it with a simple plugin, though.
To get started, you’ll need to sign up for a free Google Analytics account. Once you complete the process, Google should give you the tracking code (alternatively, you can find this code by going to Admin → Tracking Info → Tracking Code):
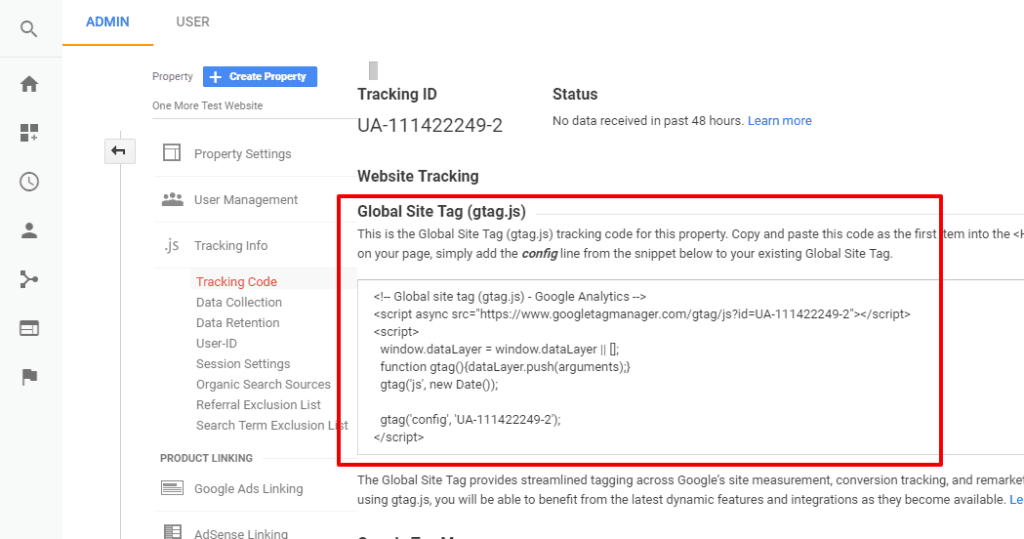
Keep the code handy. Then, go back to your WordPress site and install and activate the free Insert Headers and Footers plugin.
Once you’ve activated the plugin, go to Settings → Insert Headers and Footers and paste the Google Analytics tracking code into the Scripts in Header box:
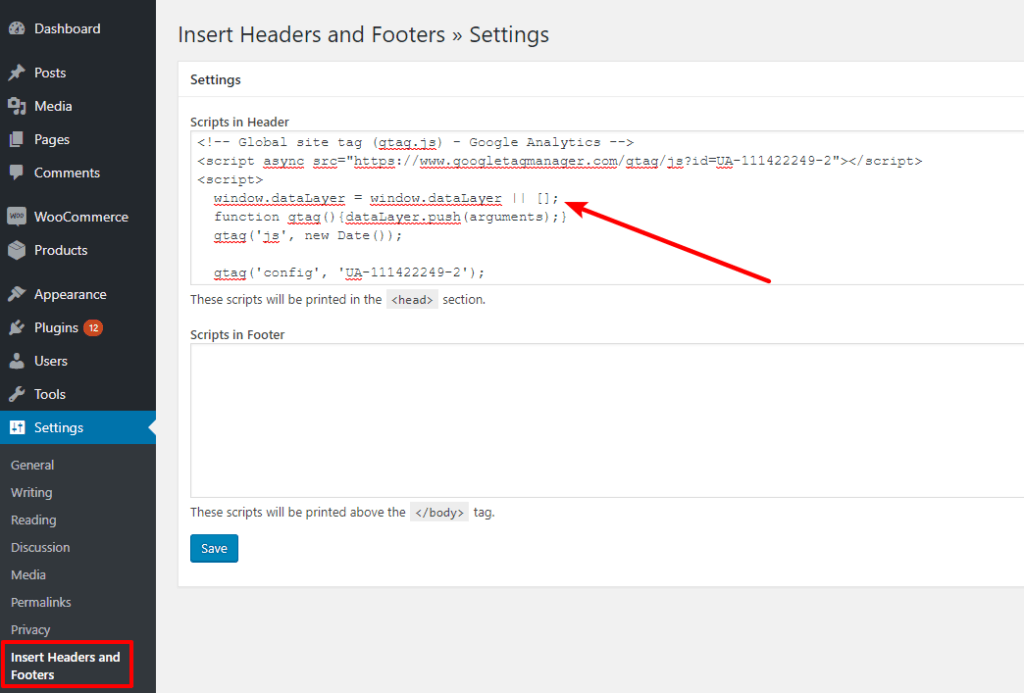
Click ‘Save’ and the universal tracking should be active. That’s all there is to it.
#How to Add Google Analytics Enhanced Ecommerce Tracking to WooCommerce
Now that you have the basic universal tracking installed, it’s time to activate Enhanced Ecommerce tracking for your WooCommerce store.
Here’s how to do it.
Step 1: Turn On Enhanced Ecommerce in Google Analytics
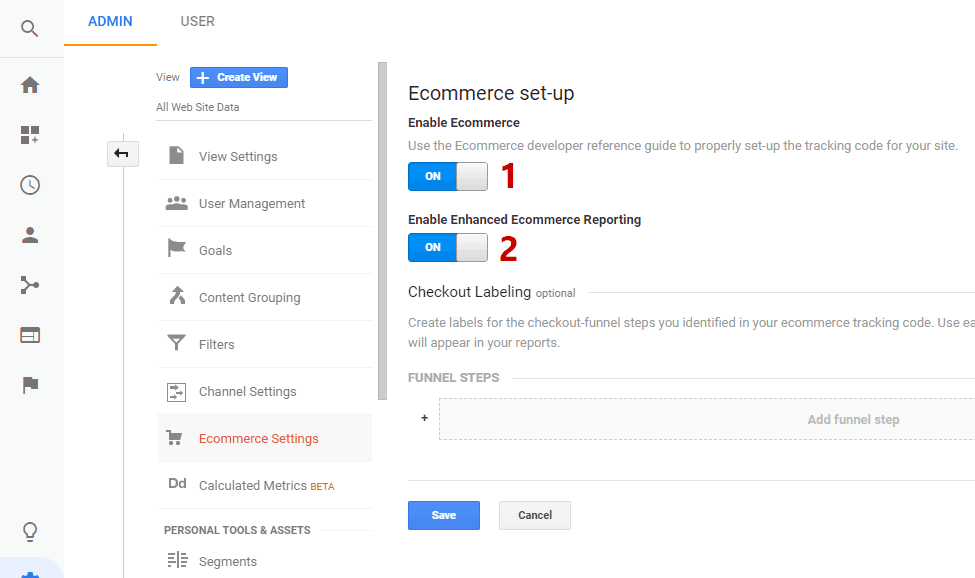
To turn on Enhanced Ecommerce in Google Analytics, go to the Admin interface. Then, look for the Ecommerce Settings options:
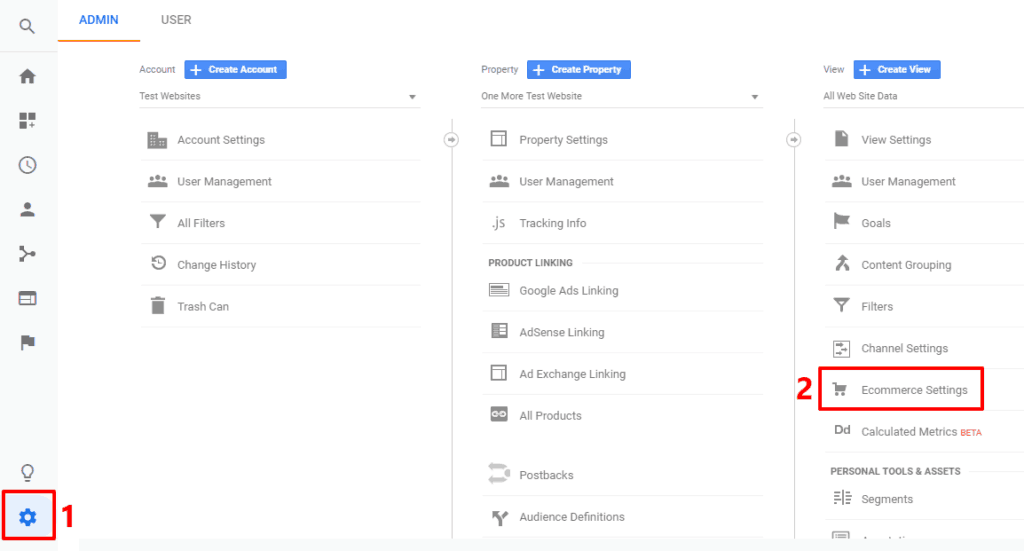
From there, use the toggle button to Enable Ecommerce. Then, choose to Enable Enhanced Ecommerce Reporting, as well. Make sure to save your changes:
Step 2: Install and Configure Enhanced Ecommerce Google Analytics Plugin
Next, go back to your WordPress dashboard, install and activate the free Enhanced Ecommerce Google Analytics plugin.
Then, go to the new Tatvic EE Plugin area in your dashboard and:
- Paste your Google Analytics ID into the box
- Check the box for ‘Add Enhanced Ecommerce Tracking Code’
- Check the box for ‘Add Code to Track the Login Step of Guest Users’ if you allow guest checkout.
- Accept the plugin’s privacy policy.
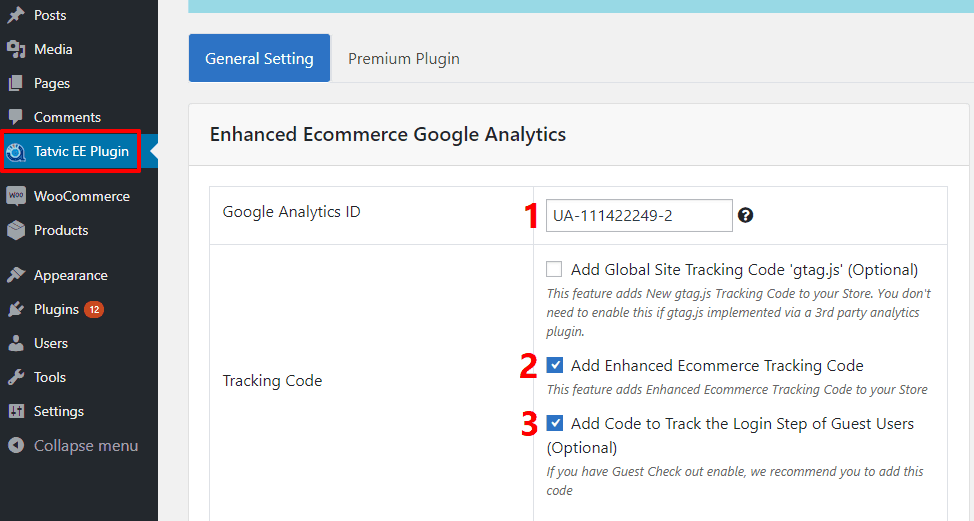
And don’t forget to make sure you save the changes!
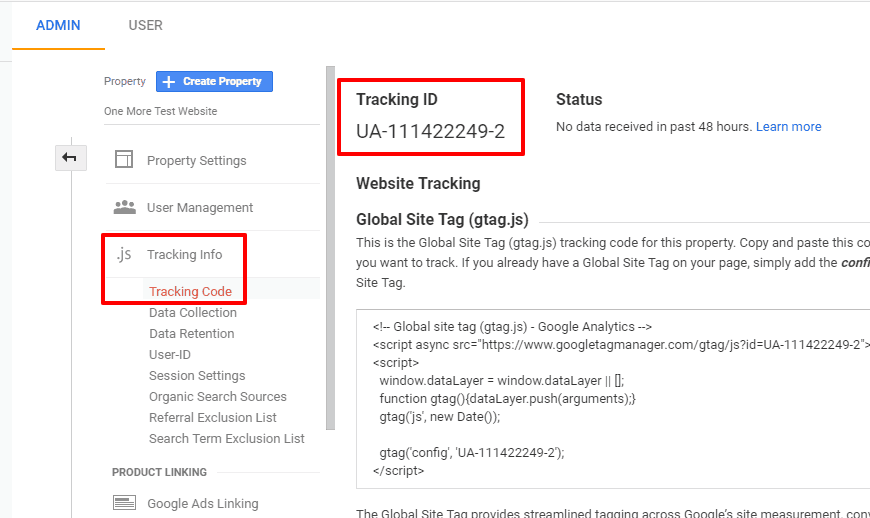
You can find your Google Analytics ID by going to Admin → Tracking Info → Tracking Code in your Google Analytics account:
Step 3: View Data in Google Analytics
Once you set everything up, you’ll be able to view your ecommerce analytics data in Google Analytics by going to Conversions → ECommerce:
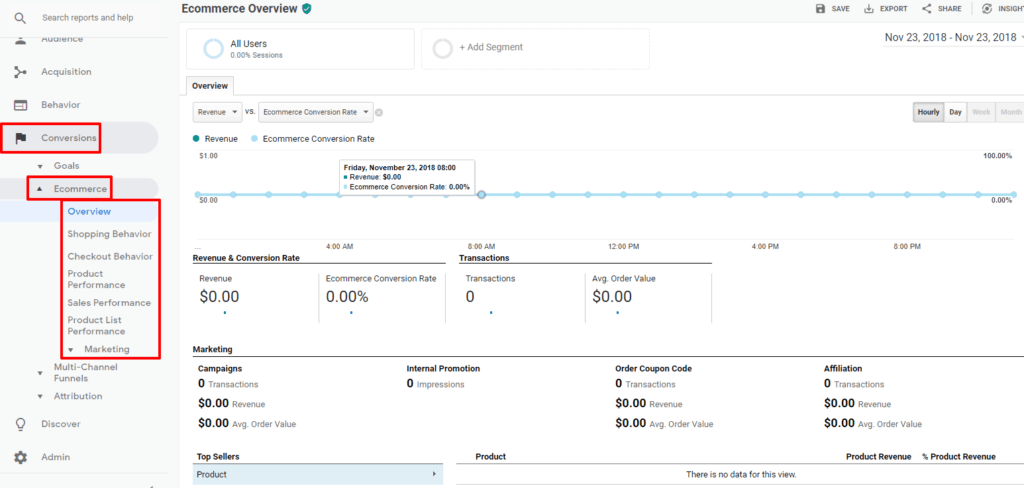
Here’s an example of what it looks like once you have some data:

The Shopping Behavior and Checkout Behavior reports are especially helpful as they let you view the health of your funnels.
#How to Set Up Facebook Pixel WooCommerce Tracking
Facebook Pixel is another valuable analytics/tracking tool for your WooCommerce store.
One of the most powerful abilities that you gain by setting up Facebook Pixel WooCommerce tracking is the option to dynamically retarget shoppers on Facebook, based on the specific products that they’re interested in.
You’ve probably seen this exact effect – you were shopping at a store. Then, the next time you logged on to Facebook, you saw Facebook ads for that product. That’s what Facebook Pixel lets you do.
Beyond that, it also lets you track important conversion data for your Facebook marketing efforts. Basically, if you do any Facebook marketing for your store, you definitely want Facebook Pixel.
To set up Facebook Pixel WooCommerce tracking, you can use a free plugin called Pixel Caffeine.
To get started, install and activate the plugin at your WooCommerce store. Then, here’s how to use it:
#Step 1: Configure Basic Facebook Pixel Tracking Code
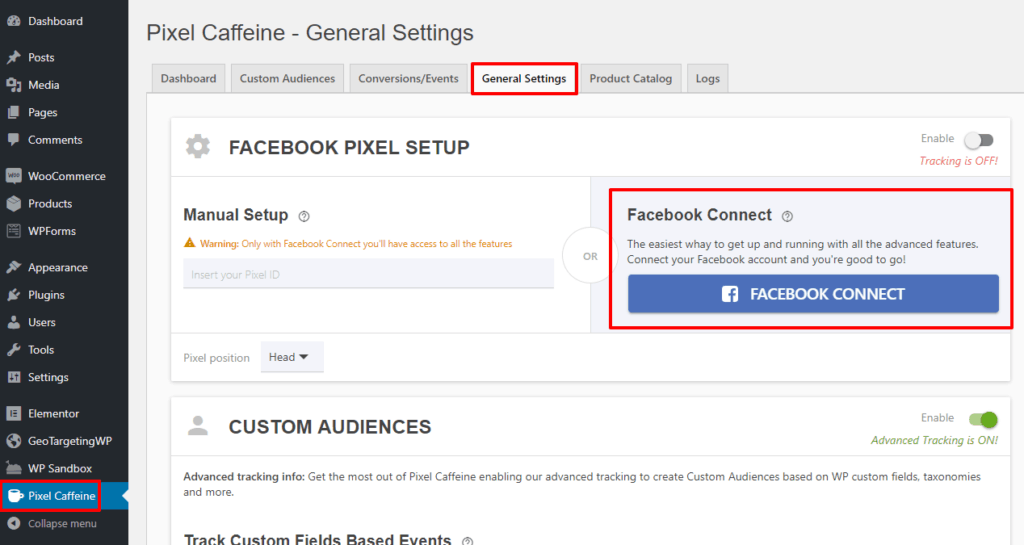
To add the basic Facebook Pixel tracking code, go to the new Pixel Caffeine tab in your WordPress dashboard.
Then, go to the General Settings tab and click the Facebook Connect button:
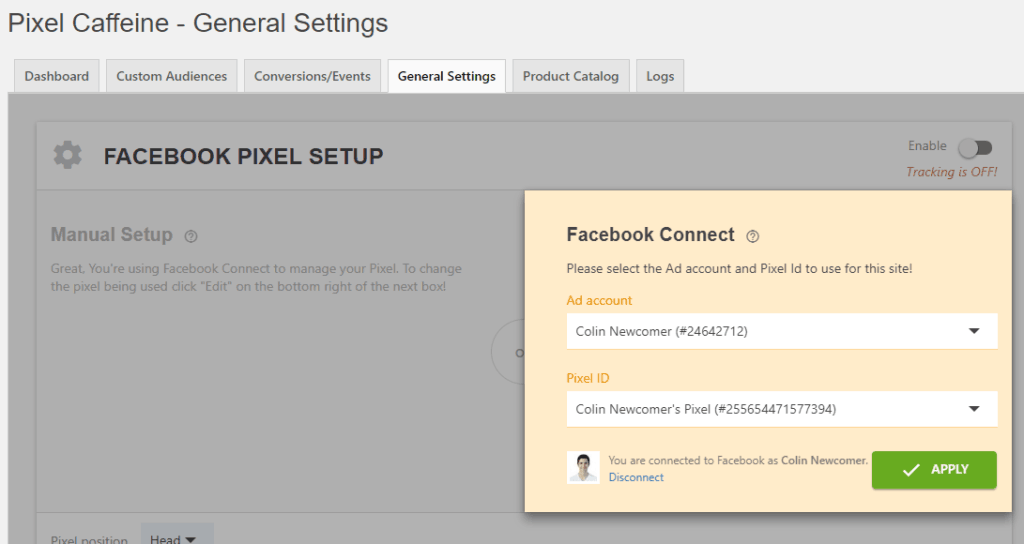
From there, the tool will give you an option to choose your Facebook Ads account and then a Pixel ID (if you don’t already have a Facebook Ads account, you’ll need to create one):
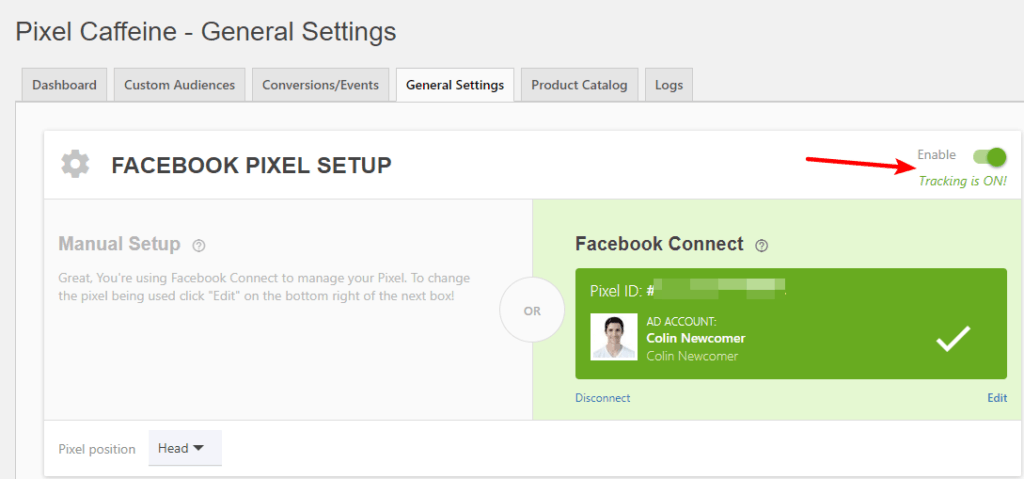
Then, you’re good to go! That’s all you have to do to add the basic Facebook Pixel.
#Step 2: Turn on eCommerce Tracking
Next, scroll down in the plugin’s General Settings tab to the Conversions area.
The plugin should automatically detect WooCommerce if it’s active on your site. Under the ‘Track this eCommerce Conversions’, check all of the boxes:
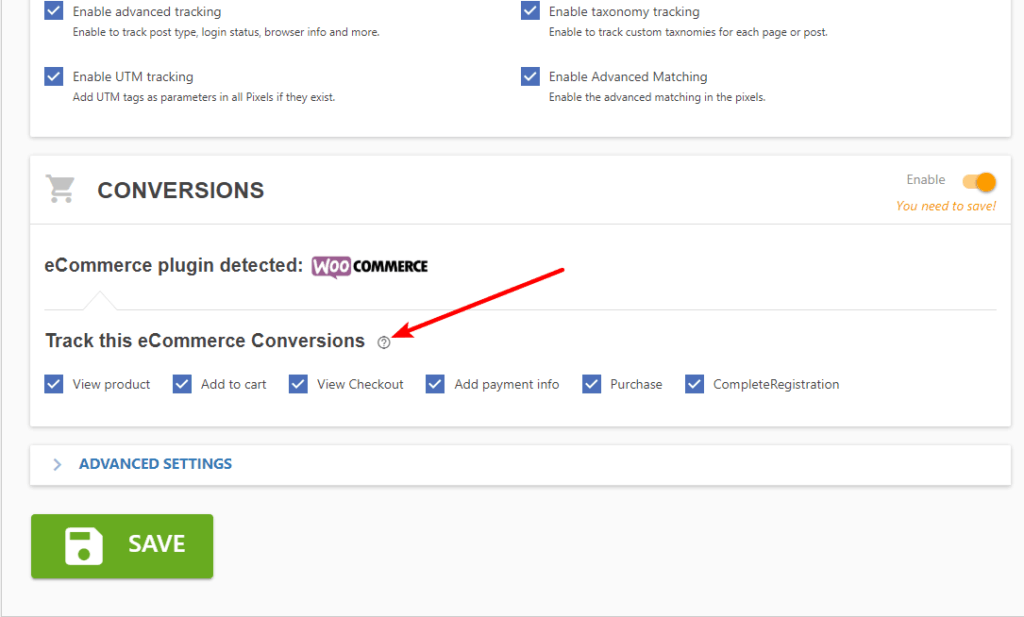
Then, save your changes.
#Step 3: Create Product Catalog (Optional)
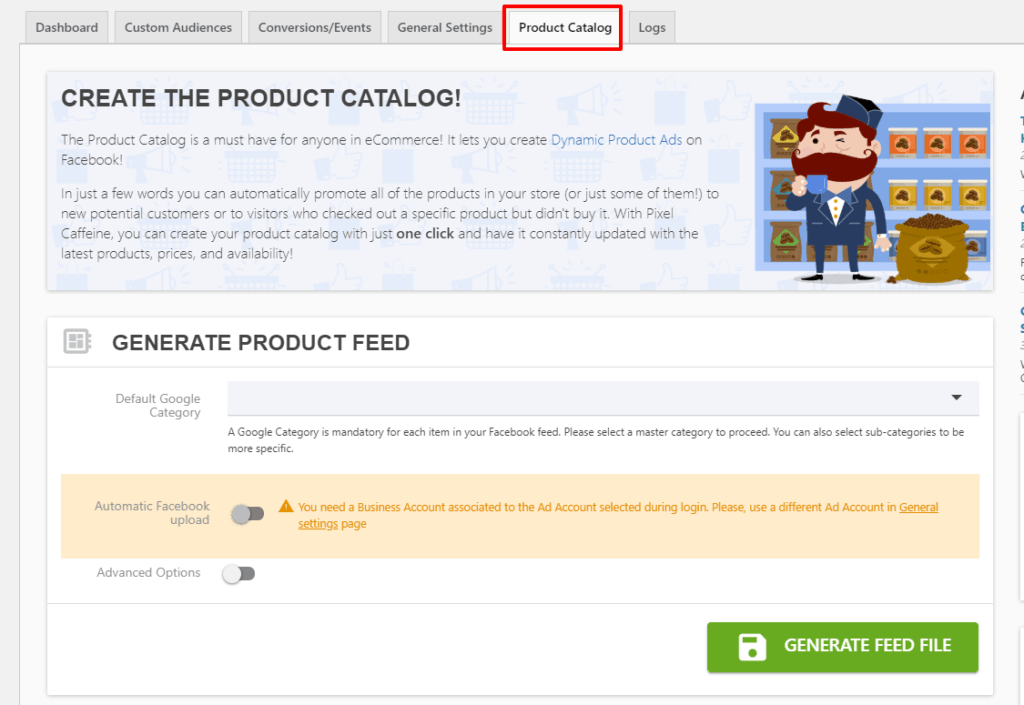
If you want to create Dynamic Product Ads on Facebook, you’ll need to do one more thing.
Go to the Product Catalog tab and complete the ‘Generate Product Feed’ form (note – you will need a Facebook Business Manager account to do this):
#How to Start Creating Custom Audiences
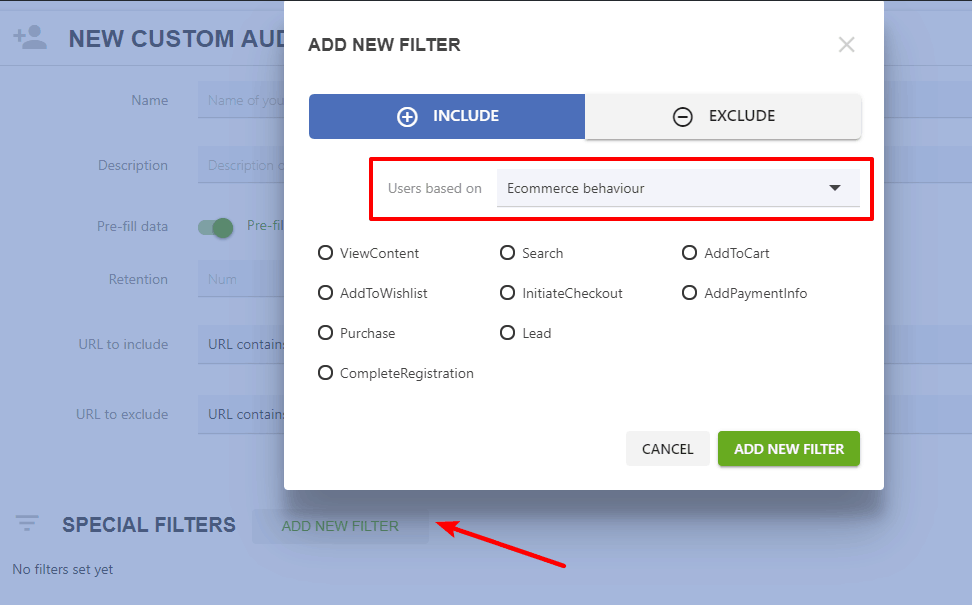
At this point, you’re all set up. To create custom audiences based on your shoppers’ data, you can head to the Custom Audiences tab and use the include/exclude filters to target shoppers.
For example, you can use the Add New Filter option to create a special filter based on Ecommerce behavior:
#Other Options for WooCommerce Analytics and Reports
Setting up Google Analytics Ecommerce Tracking and Facebook Pixel gives your site a strong foundation for overall analytics, as well as Facebook-specific analytics. But there are also a lot of other tools that can further help with analytics and reports.
Before we finish out this guide, here are three quality WooCommerce analytics plugins for further consideration:
#1. Metorik
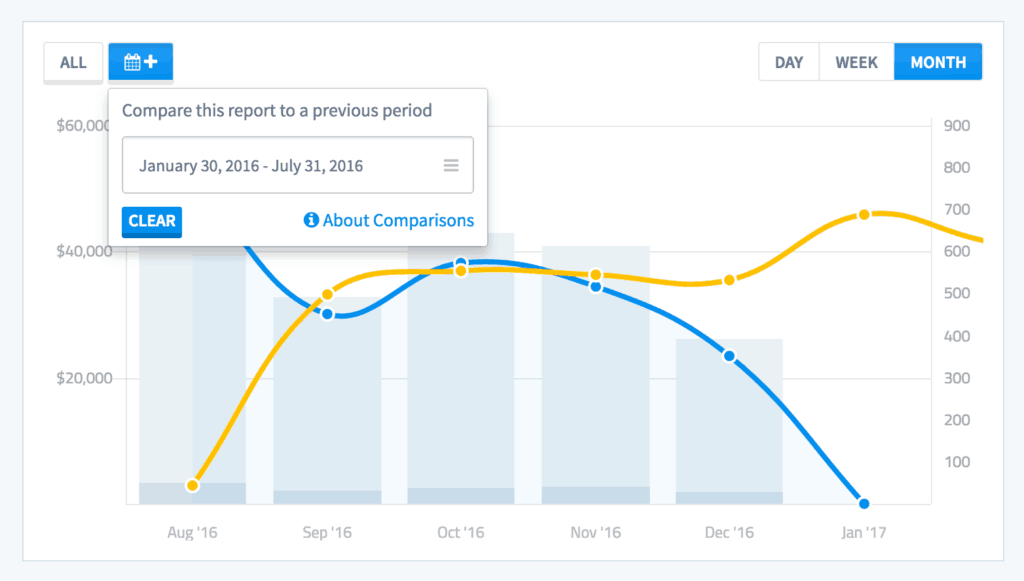
Metorik is a powerful WooCommerce reporting interface that’s built by Bryce Adams, a former Automattic engineer who actually worked on WooCommerce. Needless to say, Bryce knows his way around WooCommerce pretty well.
Metorik offers:
- Beautiful reports
- Detailed segmenting options. Filter by customer, product, orders, and more.
- Cart tracking, including the ability to send abandoned cart emails.
- Subscription analytics for subscription businesses, including MRR, churn, retention, etc.
#2. Mixpanel
Mixpanel makes it really easy to segment your store’s data to find actionable insights into your shoppers. If you’ve ever wished that you could really drill-down into your store’s data, Mixpanel is built to do that.
The Mixpanel WooCommerce extension from Skyverge makes the setup process easy.
#3. Abandoned Cart Reports for WooCommerce
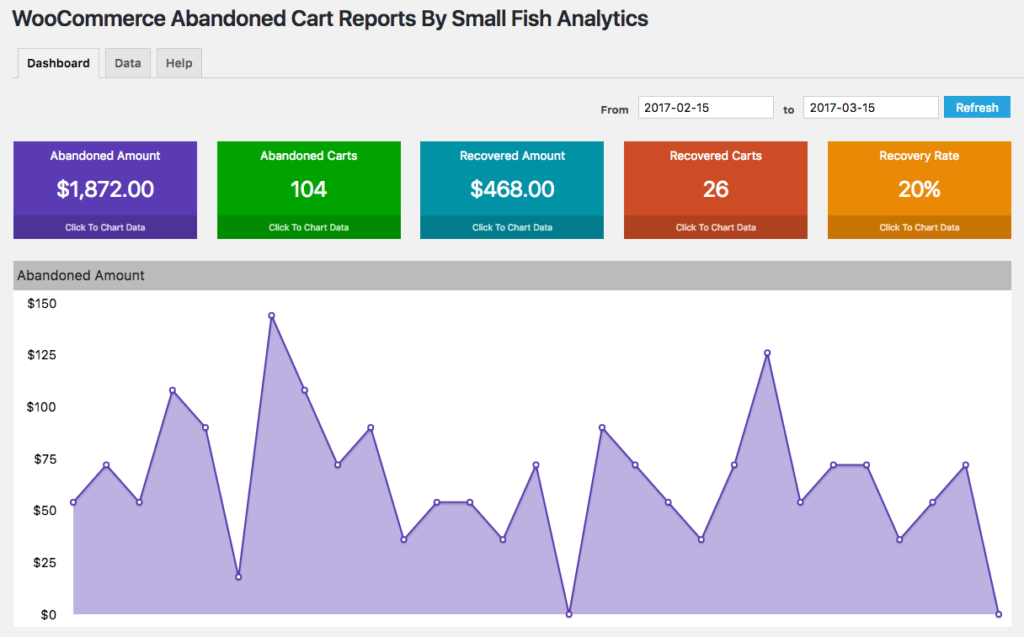
As the name suggests, the Abandoned Cart Reports for WooCommerce plugin makes it easy to see how many abandoned carts your store experiences, as well as which products get abandoned (or recovered) the most.
#Understand Your Store Better with WooCommerce Analytics
Knowledge is power, and setting up a good WooCommerce analytics system will let you understand exactly what drives shoppers to buy and what isn’t working, as well.
Get started with WooCommerce Google Analytics Enhanced Ecommerce tracking and Facebook Pixel today. And if you decide you want a deeper look, you can consider adding tools like Metorik, Mixpanel, or others.

