

Success in any online endeavor hinges on data. For website owners, one of the most important things you can track is how many visitors you get, where they come from, and how they behave when they reach your publication. Knowing what your readers want is the first step to building a thriving online presence, and you simply can’t do that without collecting data.
Google Analytics is the largest site analytics platform around. The free service provided by the search giant allows you to track just about everything users do on your site, right down to the time they spend reading articles and the links they click. Google has made it as easy as possible to add Analytics to any site. With the right WordPress plugin, you can reap all the benefits the platform has to offer without ever editing a single line of code.
#Why Are Analytics Important?
It doesn’t matter if you run a small blog or are at the head of a blooming WordPress empire, analytics are key to staying in the game. We can not stress enough the importance of data analytics in WordPress publishing and the various actions you can perform to improve your website performance, ranging from properly collecting and analyzing data, to sharing and storing it across time.
Google’s service is free, it provides a ton of useful data, and it’s ridiculously easy to install. Really, there’s no excuse not to be using it. But if you need more arguments, here are some of the most valuable pieces of information that Google Analytics offers you:
- The number of people visiting your website and how many pages they view at each visit they pay
- When people visit your website so you know when to schedule content updates
- How people find your website, including website referrals, social media links, and keywords filled into search engines
- Which links people click on when they visit your site
- Where your visitors are from and what their interests are.
#What Does Google Analytics Track?
The short answer is just about everything. You can set up Google Analytics to provide an incredible amount of data about your site visitors’ habits, including custom goals tailored to your needs. Most people will be fine with the default information, but if you’re interested in becoming a power user, there’s a lot to unlock with this free tool.
Below are the most common and probably the most useful categories of information Google Analytics will provide about your WordPress page:
- Bounce Rate – How many visitors look at just one page before leaving your site immediately. It’s good for gauging general interest in your site.
- Goals/Conversions – Create actions and see how many visitors fulfill the corresponding conditions. For example, you might set Google Analytics to track downloads for a particular piece of content, then use it to find out more detailed information about how/why they downloaded that file.
- Page Views – How many pages/articles a visitor clicks on your site.
- Session Duration– How long each visitor stays on your site.
- Sessions – How many unique and returning visitors land on your page.
- Traffic Source – Where your visitors come from (search engine, clicked on an ad, from website referrals, etc.)
#Adding Google Analytics with WordPress Plugins
The most common method of adding Google Analytics to WordPress is to use a plugin. The benefit of doing it this way is you’ll have reliable tracking code inserted across your entire installation, even if you change themes. You’ll often get extra benefits, too, depending on the plugin itself. But before you can get started, there are a few steps you’ll need to complete.
#Step 1 – Join Google Analytics
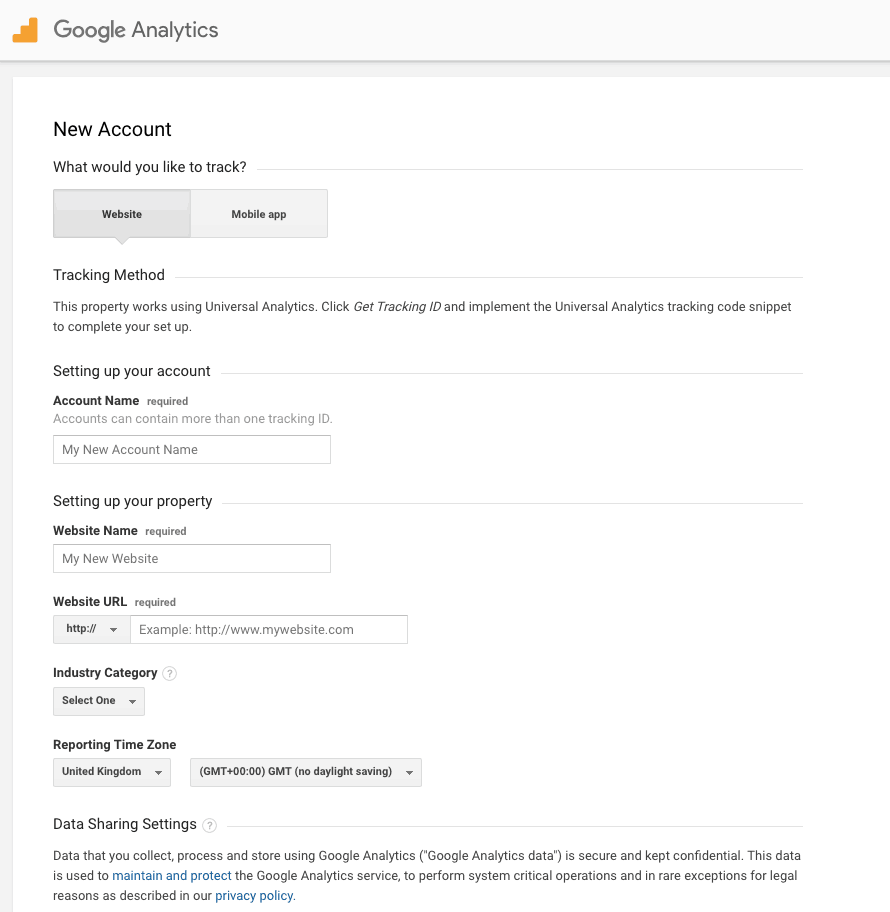
You’ll need a Google Analytics account before doing anything else. It’s free to use and should only take a few seconds to set up. Create an account with Google if you don’t already have one. Next, go to analytics.google.com and sign in using your Google credentials. Fill out the required information and your account will be ready to use.
#Step 2 – How to Install Plugins
WordPress makes it easy to install plugins. There are two main methods most people use: direct dashboard installs and manual downloads. You can use either one, but the dashboard installs are usually faster, more direct, and more convenient.
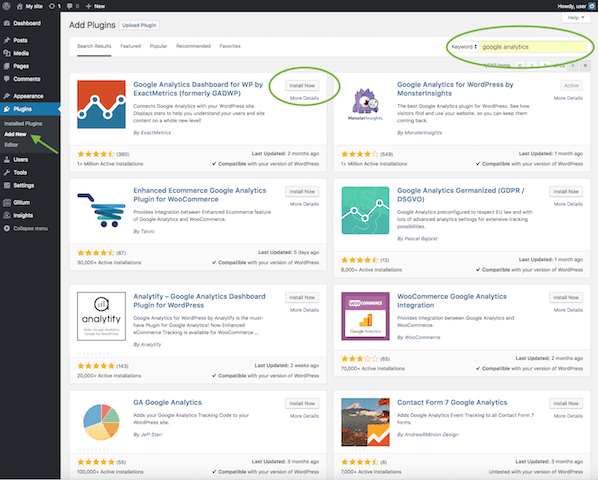
To install any of the plugins below, simply go to your WordPress dashboard and hover your mouse over the Plugins section. Choose Add New from the child menu. You’ll see a search box at the top right of the next screen. Type in the plugin name from below, then press Enter. When you see your plugin in the list, click Install Now, wait for it to download, then click the blue Activate button and you’re set.
If you want to manually install the plugins, follow the links provided in the sections below to visit the plugin’s page on WordPress.org. You’ll need to download each plugin individually, save the file to your computer, then log into your WordPress dashboard. Visit the plugins section as outlined above, but instead of searching for it in the box, click the Upload Plugin button at the top. Upload the file you downloaded, install and activate, then you’re ready!
#Step 3 – Linking Your Analytics Account
It doesn’t matter which plugin you use for Google Analytics; you have to associate it with your account in order to track your visitors. Depending on the plugin, you may have to authenticate it with your Google account or simply add the tracking code to the plugin interface and save the changes.
Because the process is different for every plugin, we can’t cover all of them here. However, most plugins provide a user-friendly walkthrough for the authorization process. Once you have the plugin installed, click its entry in the side menu bar, or visit its settings page and look for an authorize option. Follow the steps to link it with your Analytics account, then you’re done.
#Best WordPress Plugins for Google Analytics
The fastest and easiest way to add Google Analytics to WordPress is to use a plugin. We’ve collected the most popular ones below, all of which are free to install and use on your self-hosted WordPress site.
#Google Analytics for WordPress by MonsterInsights
One of the top Google Analytics plugins with over 15 million downloads and 2 million active users. The MonsterInsights plugin is a no-fuss solution for connecting your WordPress site with Google Analytics. Install it and associate it with your Google account and you’re essentially done. This plugin provides you with full dashboard access, real-time stats, page-level analytics, ad tracking, and a lot more.
It’s easy to install and use; the first step is to search Google Analytics for WordPress by MonsterInsights in the WordPress plugins, press the Install Now button and when the installation is done, activate it.
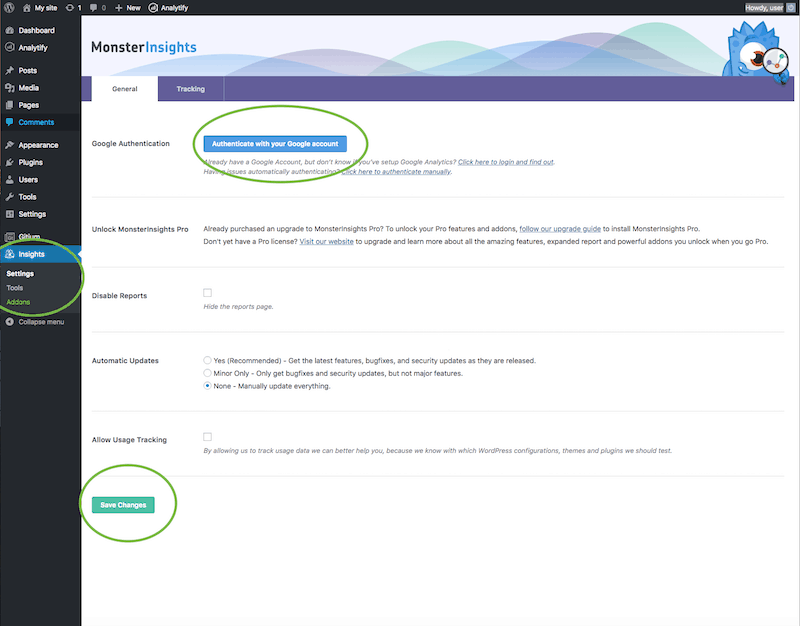
After you have installed Google Analytics for WP by MonsterInsights, you should go to Settings or Insights and authenticate with your Google account.
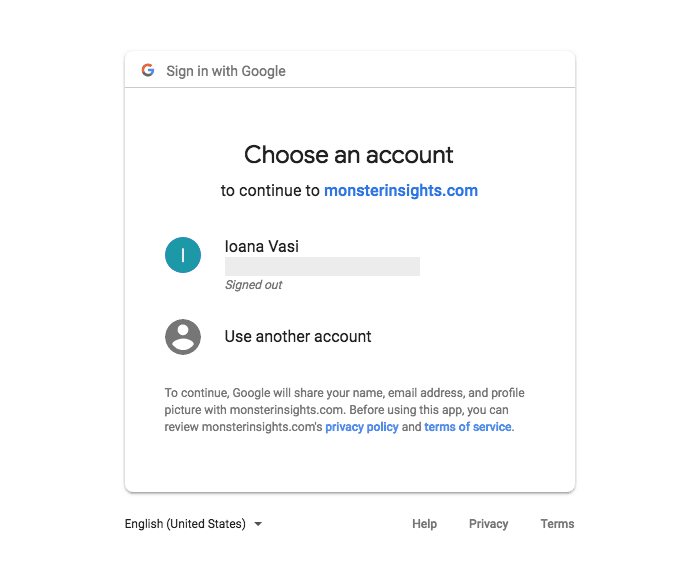
To configure your Google Analytics you need to choose a Google account and to allow monsterinsights.com to access your account.
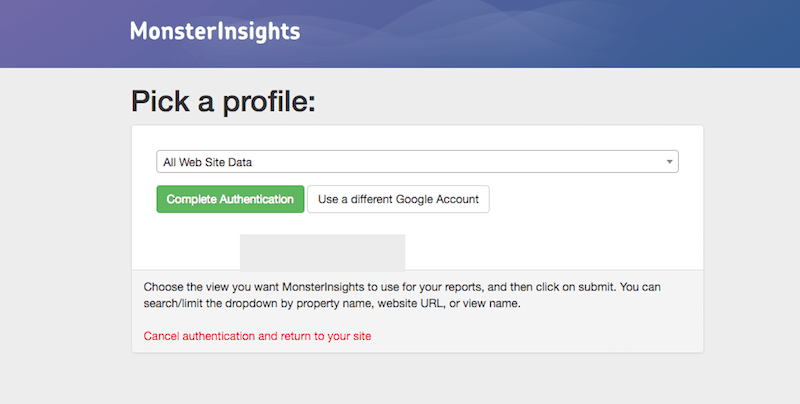
Pick a Profile
Choose a website that you want to be monitored by MonsterInsights and click on Complete Authentication and save the changes.
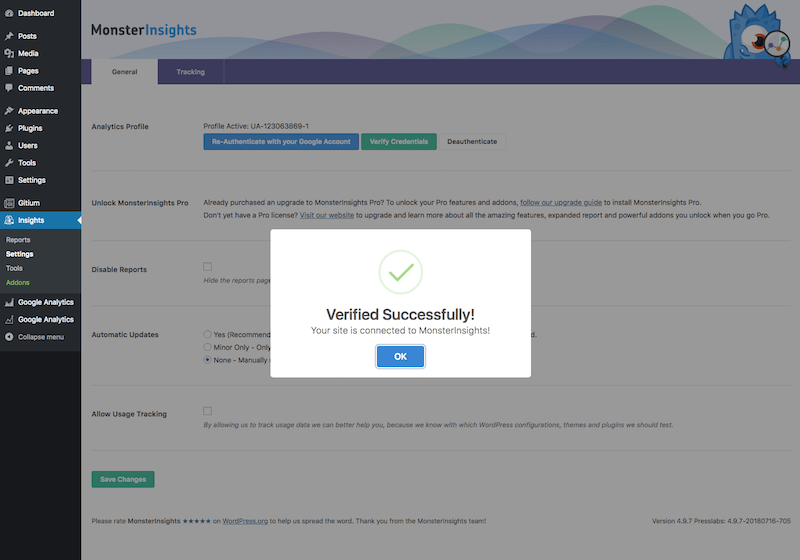
To check if your site is connected to MonsterInsights, click on the Verify Credentials button.
MonsterInsights comes in two versions: Lite and Pro. Lite is free for everyone and provides basic Google Analytics tracking for your entire website. Most people will be fine with this, as it provides more than enough features to keep you informed. Upgrading to the paid Pro version adds advanced tracking, tracing, and customization features.
#Google Analytics Dashboard for WP
Another extremely popular Analytics plugin, this one made by ExactMetrics and formerly known as GADWP. Over one million people currently use the software to easily track WordPress traffic via Google Analytics, all without touching a single line of code. It gives instant access to almost all of your Google Analytics reports, along with real-time stats, code customization, and detailed tracking for events like downloads, e-mails, outbound and affiliate links.
Because we want to help you to simplify the installation process, below you will find all the steps you should take to enable a plugin.
First of all, go to WordPress Dashboard and select the Plugins section> Add New and press the Install Now button and activate it.
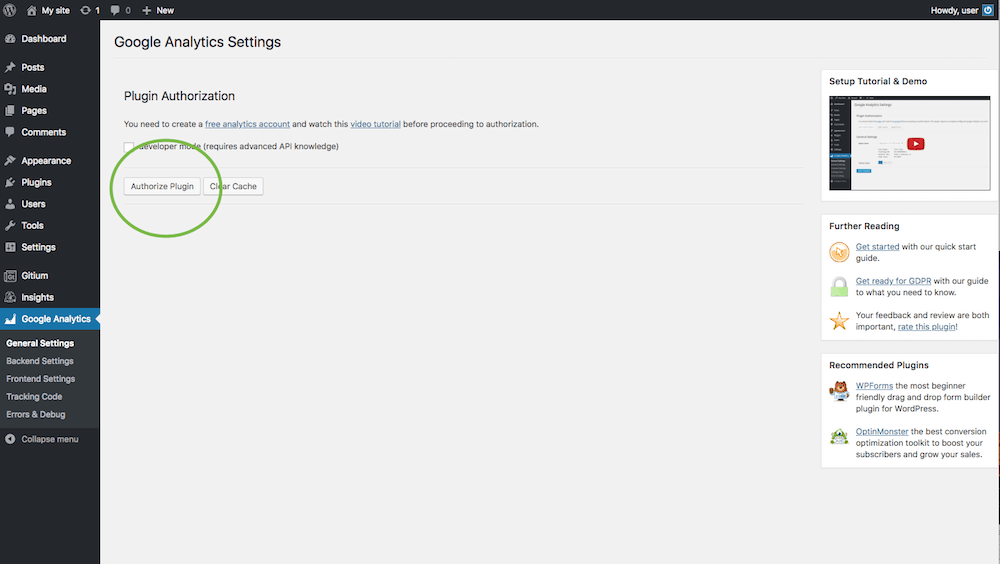
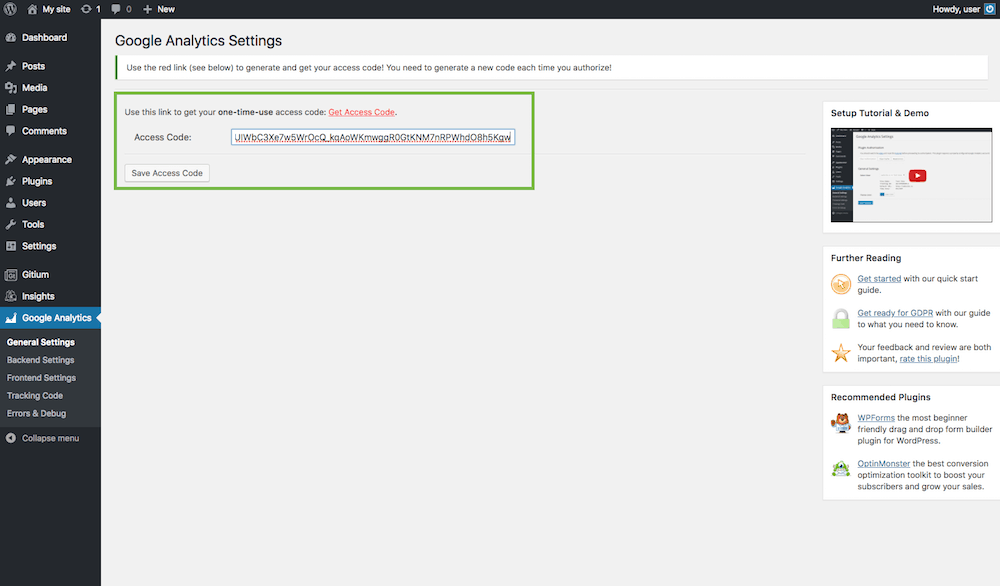
When the installation is done, go to settings and select Authorize Plugin button.
Use the red link to generate your access code.
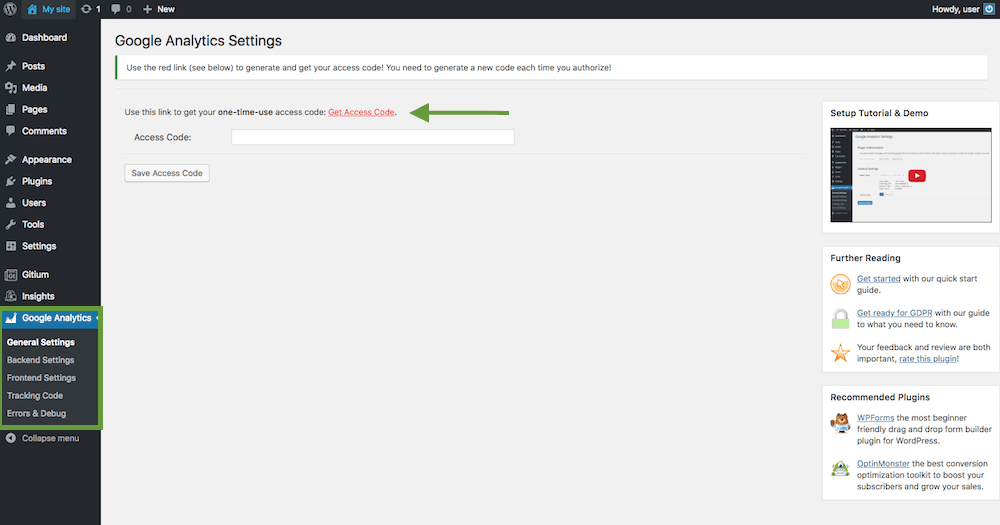
Allow Google Analytics Dashboard for WP to access your google account, copy the generated code and paste it into the Access Code and save the changes.

The best part about Google Analytics Dashboard for WP is that it’s entirely free to use. There’s no pro or premium version to upgrade to, and the free version includes features usually associated with paid subscriptions. If you need more powerful tracking than simple traffic and page view numbers but aren’t ready to fork over a lot of cash, this is definitely the plugin for you.
#Analytics Cat
If simple Google Analytics tracking is all you need, Analytics Cat can get the job done. The bloat-free plugin lets you add your Universal Analytics Code from Google Analytics, then it deploys it on all of your pages to track basic user activity. There’s no configurations to set, no complicated setup process, and no need to give it access to your Google account. Just add the UA and you’re good to go.
Now let’s start to install this plugin and you will love it. First of all search for the plugin in the WordPress Plugins section, install the plugin and then activate it. If you are ready to get started select the Google Analytics Manager and add your Google Analytics ID and save it.
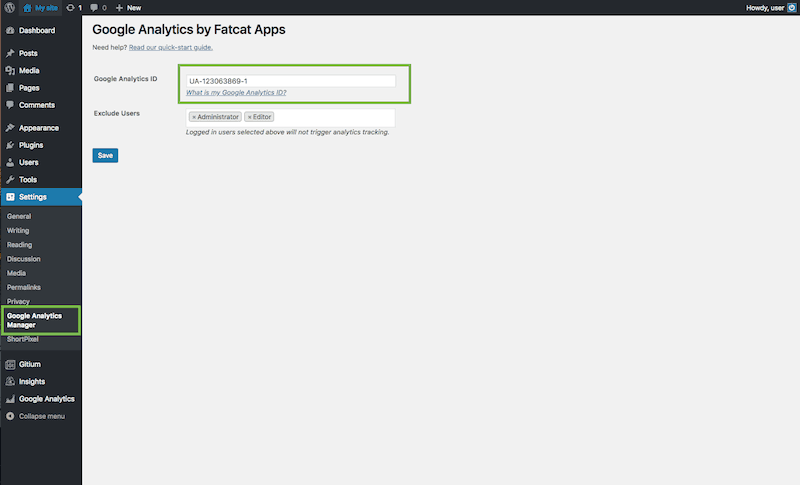
To get your Google Tracking ID you should sing into your Google Analytics account and click on the Admin tab.
![]()
Select the Property Settings and click on the Tracking Info > Tracking Code, now can get your tracking ID.
#GA Google Analytics
The GA Google Analytics plugin for WordPress does only one thing and it does it well. Add it to your site, associate it with your Analytics account, then sit back and enjoy tracking data, plain and simple. You won’t get fancy WordPress dashboard features or customizable extras, but you also won’t have to deal with paid premium upgrades or any complex interface. It’s simplicity in its finest form, making this a great plugin for basic Google Analytics users.
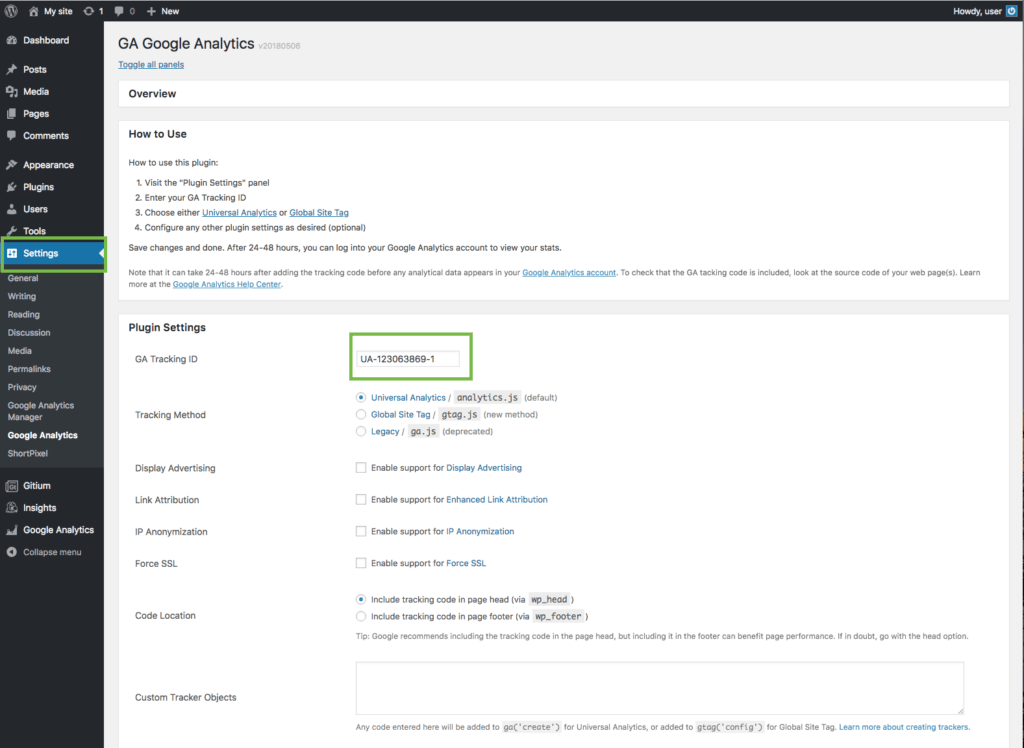
GA Google Analytics installation is made in the same way you have installed the previous plugins. To configure your GA Google Analytics plugin, visit the Plugin Settings and add your Tracking ID, as a tracking method select Universal Analytics or choose Global Site Tag. When you are done, save it. Please notice that it could take one or two days after you add the tracking code before you can access the data insight.
#WD Google Analytics
A simple but versatile Analytics plugin by WebDorado. Install it on your WordPress site to deploy the Analytics code to all of your pages and gain access to comprehensive information straight from your Google Analytics account. With WD you’ll get a centralized dashboard packed with reports, letting you monitor traffic and visitor activity without leaving your WordPress installation.
In simple terms, here’s how to install WD Google Analytics. Select the Plugin section > Add New and search for WD Google Analytics in the search box. Install the plugin and activate it by pushing the Install Now button and Active button. Go to settings and click the Authenticate button.
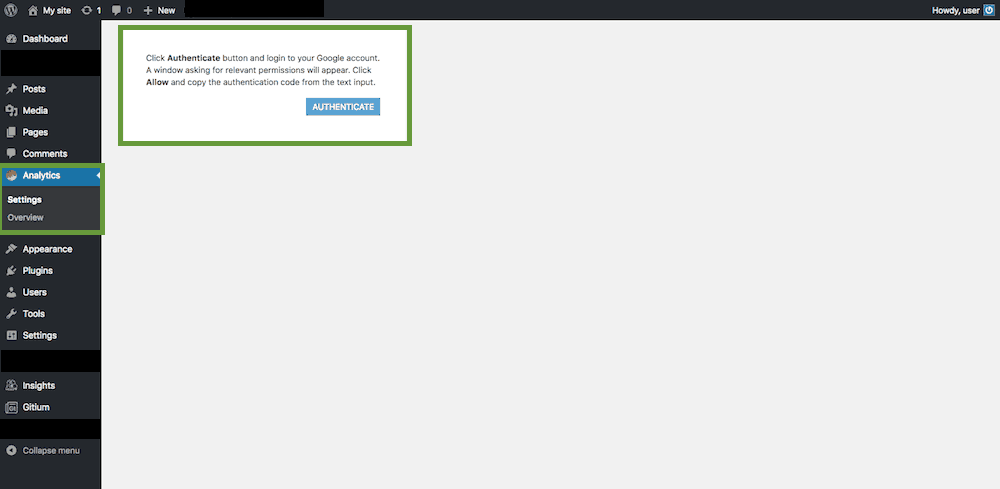
It’s time to allow Google Analytics WD to access your Google account. Use the link to get an access code.

Copy the code and paste it into Access Code section and after that hit Submit.
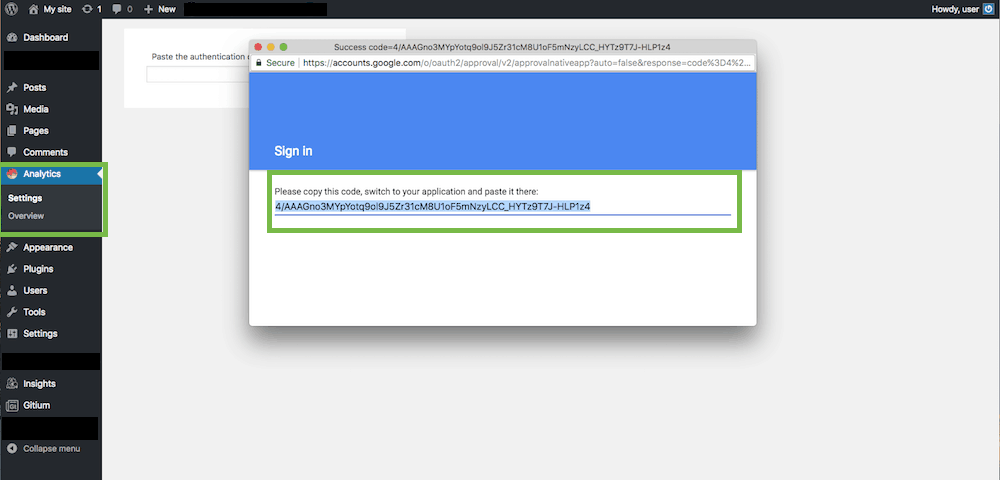
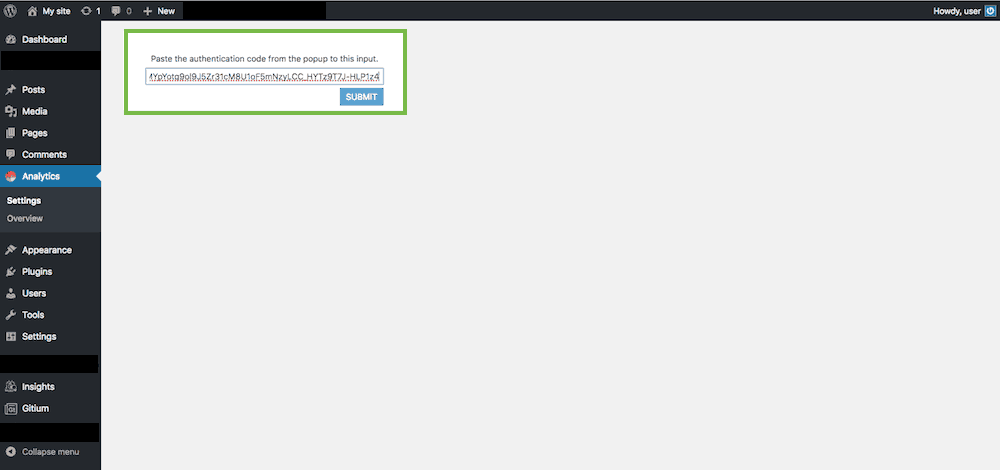
The WD Google Analytics plugin comes in both free and premium versions. Like similar products, most users will get by just fine with the free version, as it provides simple tracking and reporting stats without much hassle. Upgrading to premium delivers custom tracking, more detailed reports, and advanced e-commerce features aimed at more traffic-dense WordPress sites.
#Google Analytics by ShareThis
The simply-named plugin that does exactly what you need it to do: stay out of the way and add the Google Analytics code to your WordPress site. After linking it with your Analytics account, you’ll have immediate access to visitor trends, traffic sources, trending content, and the standard visitor and page view counts, all from the convenience of your WordPress dashboard. The plugin also includes a trending content feature that shows you content that’s performing better than average, so you can capitalize on the rising value.
After installation, you should go to Google Analytics > Settings and select Authenticate with Google.
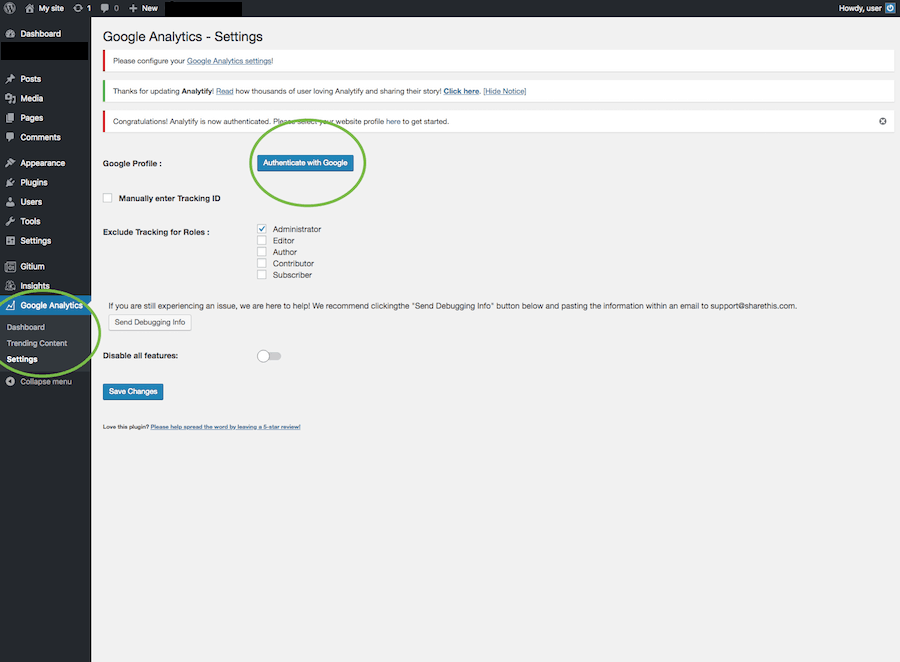
To configure your Google Analytics plugin, you need to choose a google account. Copy the code and switch to the application and past it into the Access Code box.
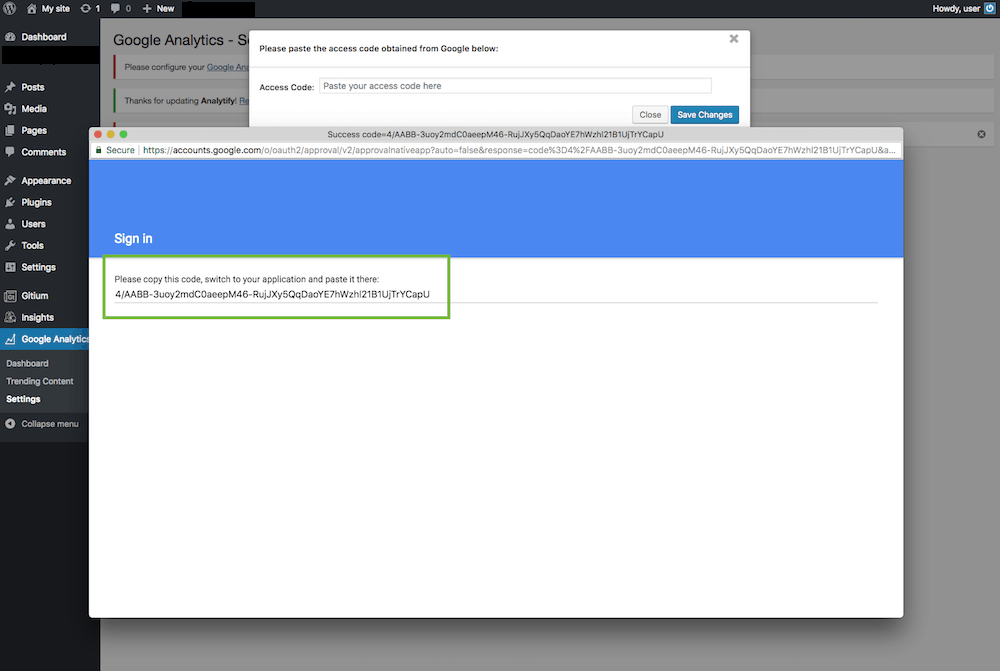
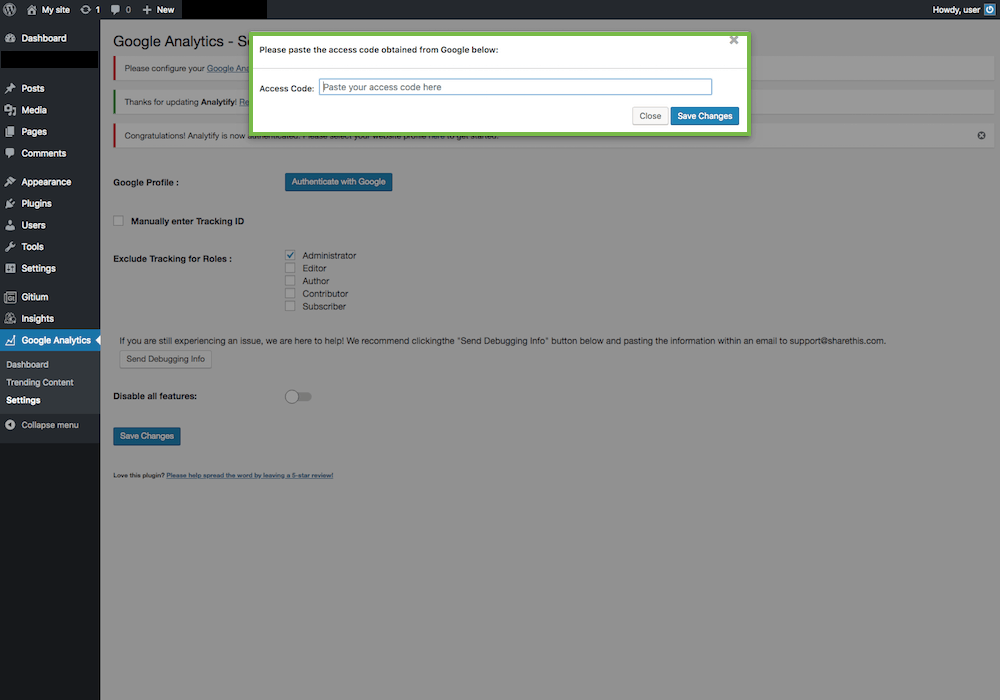
Select your Google Analytics Account and save the changes.
Go to Google Analytics > Tracking Code and enable the tracking type.
![]()
Now you’re done and you can enjoy all the benefits you get with this plugin.
Google Analytics by ShareThis is a completely free plugin with no paid upgrades whatsoever. You can enjoy all of its interesting features at no charge no matter how large your WordPress site or how many visitors you get.
#Analytify
The Analytify team focuses almost exclusively on WordPress analytics plugins, most of which leverage the Google Analytics platform for collecting and presenting data. Analytify is the company’s main focus, and it’s arguably the most attractive of the plugins we’ve featured in this article. With it, you’ll gain access to all of Google Analytics’ advanced reporting and tracking features in one sleek, combined interface available directly on WordPress. No need to mess with Google’s awkward layout, just sign into Analytify and you’re instantly a power user.
Let’s see which are the steps you should follow to install Analytify. To start with, go to Plugins, select Add New and search for Analytify. Install the plugin and then activate it.
Click on the Analytify Panel and for using Analytify you should connect the plugin with Google Analytics account.
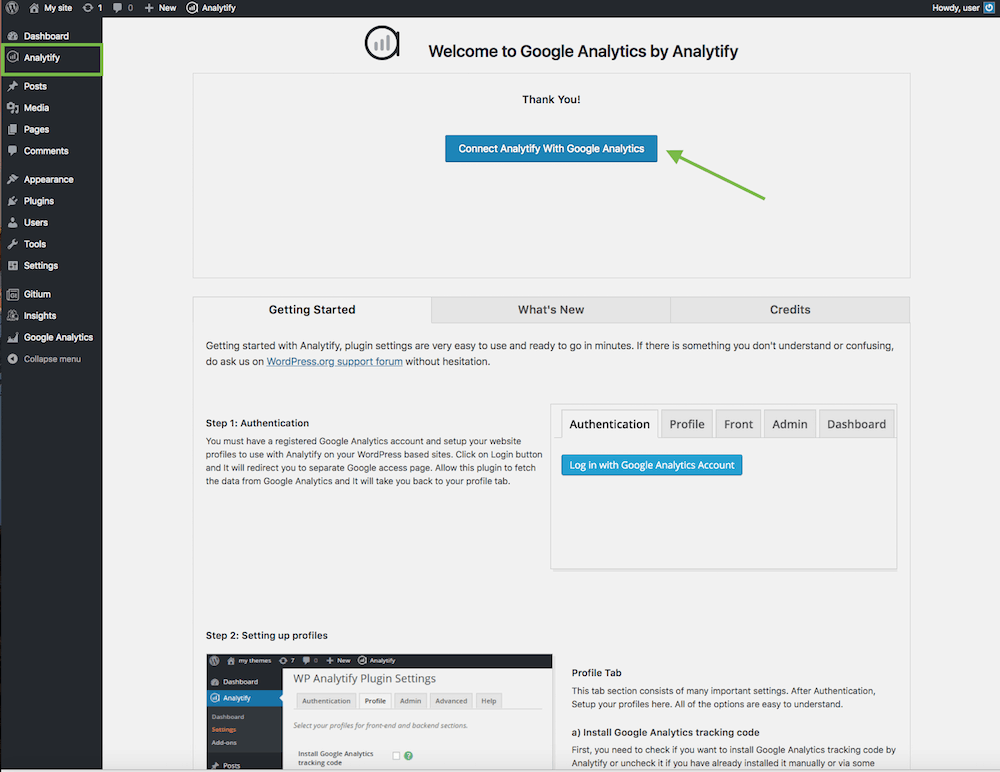
Now it’s time to set up your Profile Settings, select your website for Back-end/ Front-end Stats and your website profile for Dashboard stats and save the changes.
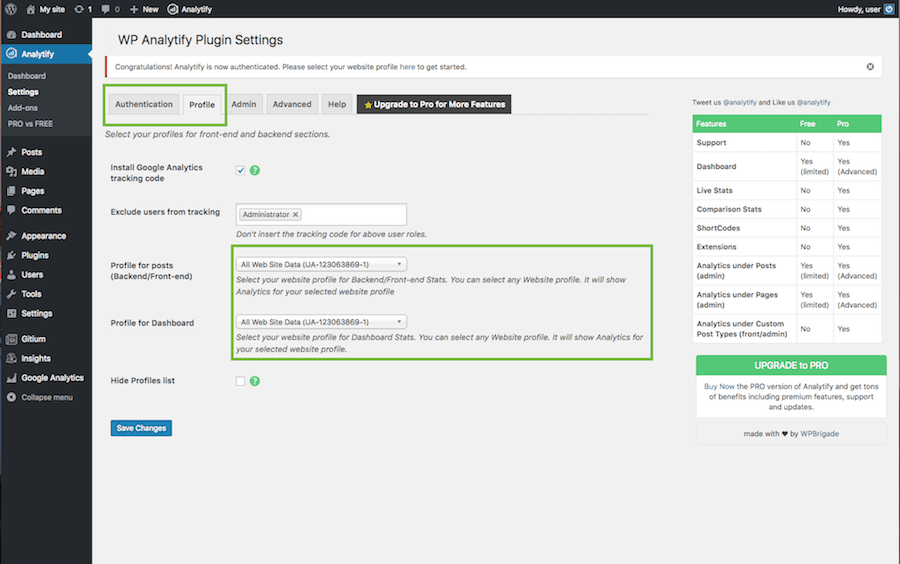
From now on you are ready to see a complete statistics of your site.
The only catch with Analytify is that there isn’t a free version to try out, only paid options. There are plenty of bundles and pricing plans to make it an affordable option, however, so don’t dismiss the plugin simply because it’s paid. If you need more specific features like WooCommerce download tracking, Analytify also offers a handful of add-on extras you can purchase for a small fee.
#How to Manually Add Google Analytics to WordPress
Manually adding Google Analytics code isn’t as complicated as you might think. Google provides a simple copy/paste script, you edit your WordPress files to add it, and that’s it. Doing this lets you avoid using an extra plugin, some of which can slow your site down considerably.
There are downsides to manually entering the Analytics code, of course. For starters, it requires a little more work to insert the script, as you have to edit your theme and place it in the right spot or risk losing data. You’ll also miss out on a few extra features offered by some plugins, and if you switch themes, you have to remember to manually copy the code over, otherwise tracking will stop instantly.
To manually add the code, firstly log into your Google Analytics dashboard, then choose the site data you want to view at the top of the screen. If you only have one property, it will be selected by default.
Click the Admin link at the bottom of the page and you’ll see three columns of options. In the center is a section called Tracking Info. Click this to unfold more options, then choose Tracking Code, and a site tag box will load. Copy everything in the site code box, including the opening and closing script tags.
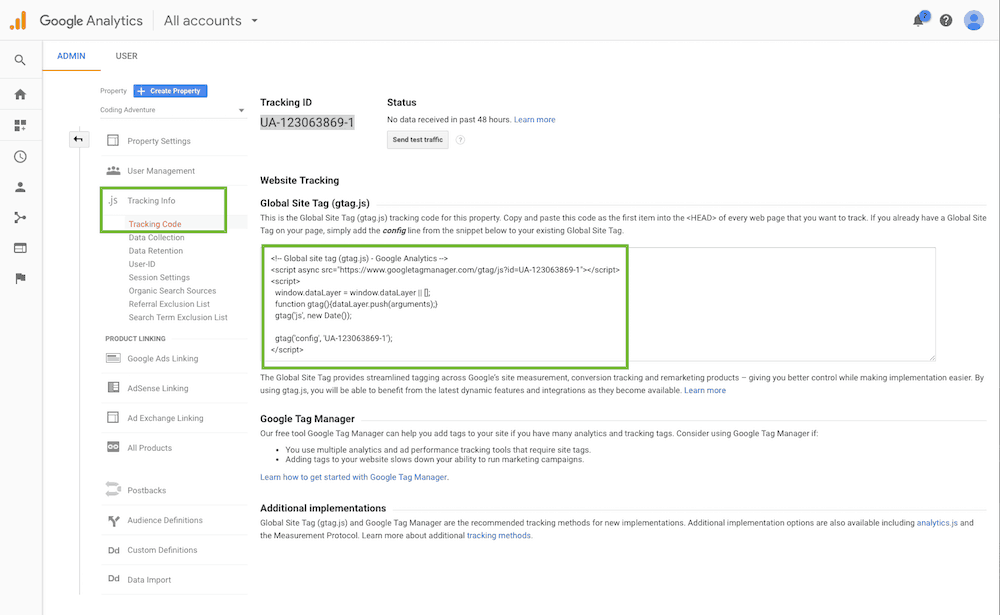
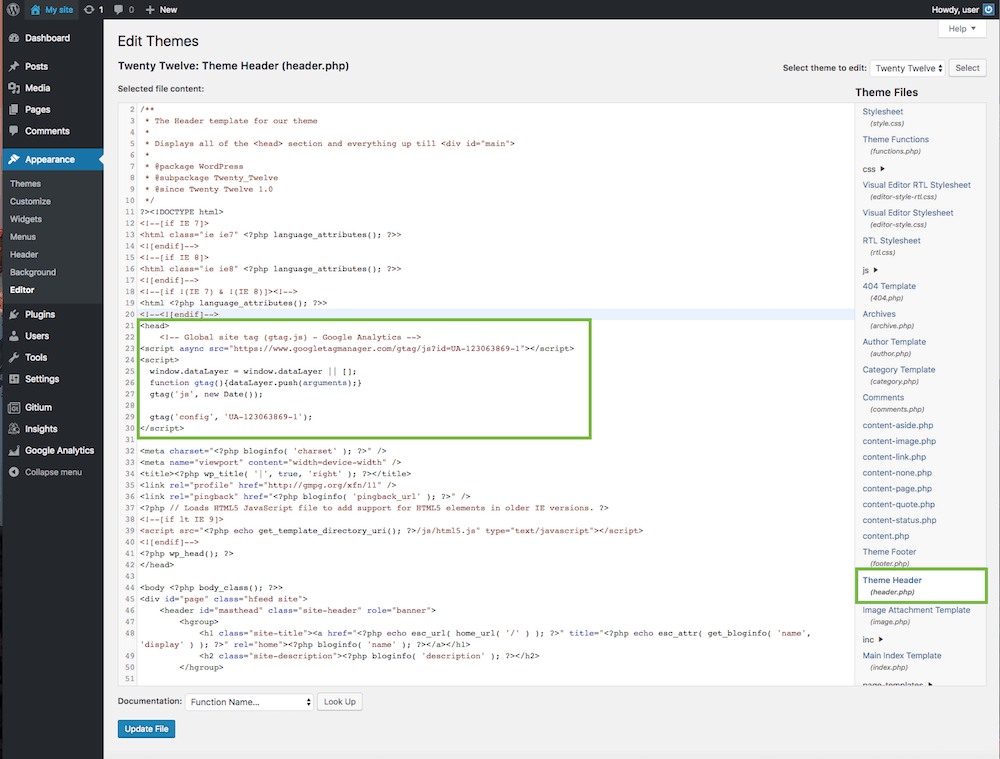
Now it’s time to add Analytics to your WordPress installation. Log into your site dashboard and go to Appearance > Editor. Look for header.php and click to see its raw code. Now paste the tracking script anywhere after the tag. Save your changes, and you’re set. After a few hours, double check your Google Analytics dashboard to make sure tracking is working as intended. If all is good, you can push it to the back of your mind until you change WordPress themes.
#Final Thoughts
Adding Google Analytics to your WordPress site isn’t as difficult as it sounds. There are a variety of one-click plugins that take care of the hard work for you and provide useful extras, as well. Getting your hands dirty with a little cut and paste code isn’t all that challenging, either! With the right tools, you can supercharge your WordPress site by gaining insights into what your visitors want from your publication.

