Good news, everyone! We’re back with our tutorials on setting up a MySQL Cluster on major platforms. After covering AWS, Google Platform Console and Microsoft Azure some time ago, we introduce you today to setting up a MySQL Cluster on Digital Ocean. Let’s do this!
#1. Create the Kubernetes cluster
Go to control panel: https://cloud.digitalocean.com/projects
From the Create menu, click Clusters.

Choose a Kubernetes version. Please bear in mind that the MySQL Operator 0.2.x requires at least Kubernetes 1.11.x (or 1.10.x with alpha features) while version 0.1.x is known to work with Kubernetes up 1.9.x.
Select a datacenter region.
Add node polls. E.g.:

Choose a name for your cluster. Optionally, add a tag.

Click Create Cluster.
Click on Download Config File to download the cluster configuration file. Please keep in mind that this option expires after 7 days.

#2. Connect to the cluster
Install kubectl. For more details, see: https://kubernetes.io/docs/tasks/tools/install-kubectl/
Test the connection. Run the following command:
$kubectl --kubeconfig="my-cluster-kubeconfig.yaml" get nodes

NAME                   STATUS    ROLES  AGE     VERSION
stupefied-allen-3a9d   Ready 		24m   	v1.11.5
stupefied-allen-3a9i   Ready 		24m   	v1.11.5
stupefied-allen-3a9v   Ready 		23m   	v1.11.5
The "my-cluster-kubeconfig.yaml" is the cluster configuration file you just downloaded.
Install helm. New to helm? Check https://github.com/helm/helm#install
It’s important to know that MySQL Operator 0.2.x requires Helm 2.11.0.
#3. Controller deploy
To deploy this controller, use the provided helm chart by running:
$ kubectl create serviceaccount -n kube-system tiller

serviceaccount/tiller created

$ kubectl create clusterrolebinding tiller-crule --clusterrole=cluster-admin --serviceaccount=kube-system:tiller

clusterrolebinding.rbac.authorization.k8s.io/tiller created
$ helm init --service-account tiller --wait$ HELM_HOME has been configured at /home/presslabs/.helm.
Tiller (the Helm server-side component) has been installed into your Kubernetes Cluster. Please note that by default, Tiller is deployed with an insecure 'allow unauthenticated users' policy. For more information on securing your installation see: https://docs.helm.sh/using_helm/#securing-your-helm-installation$ helm repo add presslabs https://presslabs.github.io/charts
"presslabs" has been added to your repositories$ helm install presslabs/mysql-operator --name mysql-operator
NAME: mysql-operator
LAST DEPLOYED: Thu Dec 13 13:33:13 2018
NAMESPACE: default
STATUS: DEPLOYEDFor more information about chart values please visit README. This chart will deploy the controller along with an orchestrator cluster.
#4. Deploying a cluster
Before creating a cluster, you need a secret that contains the ROOT_PASSWORD key. An example for this secret can be found at examples/example-cluster-secret.yaml. Create a file named example-cluster-secret.yaml and copy into it the following YAML code:
apiVersion: v1
kind: Secret
metadata:
  name: my-secret
type: Opaque
data:
  # root password is required to be specified
  ROOT_PASSWORD: bm90LXNvLXNlY3VyZQ==
Now, to create a cluster you need just a simple YAML file that defines it (an example can be found at examples/example-cluster.yaml). Create a file named example-cluster.yaml and copy into it the following YAML code:
apiVersion: mysql.presslabs.org/v1alpha1
kind: MysqlCluster
metadata:
  name: my-cluster
spec:
  replicas: 2
  secretName: my-secret
For a more in-depth configuration, check these examples.
Deploying a cluster:
$ kubectl apply -f example-cluster-secret.yaml
secret "my-secret" created
$ kubectl apply -f example-cluster.yaml
mysqlcluster.mysql.presslabs.org "my-cluster"  created
To list the deployed clusters, use:
$ kubectl get mysql
NAME		AGE
my-cluster	1m
To check cluster state, use:
$ kubectl describe mysql my-cluster

Name:     	my-cluster
Namespace:	default
Labels:
Kind:     	MysqlCluster
Metadata:
Creation Timestamp:  2018-12-13T12:15:12Z
  Generation:      	1
  Resource Version:	124984
  Self Link:       	/apis/mysql.presslabs.org/v1alpha1/namespaces/default/mysqlclusters/my-cluster
Status:
  Conditions:
    Last Transition Time:  2018-12-14T09:30:06Z
    Message:               Cluster is not ready.
    Reason:                statefulset not ready
    Status:                False
    Type:                  Ready
    Last Transition Time:  2018-12-14T09:30:09Z
    Message:               cluster is in read only
    Reason:                ClusterReadOnlyTrue
    Status:                True
    Type:                  ReadOnly
    Last Transition Time:  2018-12-14T09:30:09Z
    Message:               no pending ack
    Reason:                NoPendingFailoverAckExists
    Status:                False
    Type:                  PendingFailoverAck
Spec:
  Replicas: 	2
  Secret Name:  my-secret
Events:#5. Access the orchestrator
To connect to the orchestrator dashboard you have to port forward orchestrator port 3000 to your local machine by using the following command line:
$ kubectl port-forward mysql-operator-orchestrator-0 3000

Forwarding from 127.0.0.1:3000 -> 3000
Forwarding from [::1]:3000 -> 3000
Write localhost:3000 in a browser.

#6. Backups
You need to have a secret to perform backups. Start by creating a file named example-backup-secret.yaml and copy it into it the following YAML code:
apiVersion: v1
kind: Secret
metadata:
  name: my-cluster-backup-secret
type: Opaque
data:
  AWS_ACCESS_KEY_ID: ###
  AWS_SECRET_KEY: ###
S3_ENDPOINT: ###Note. AWS_ACCESS_KEY_ID, AWS_SECRET_KEY and S3_ENDPOINT must be base64 encoded.
You need to create a storage bucket (Space).
From the Create menu, click Spaces.

Select a datacenter region and choose a unique name for the Space.
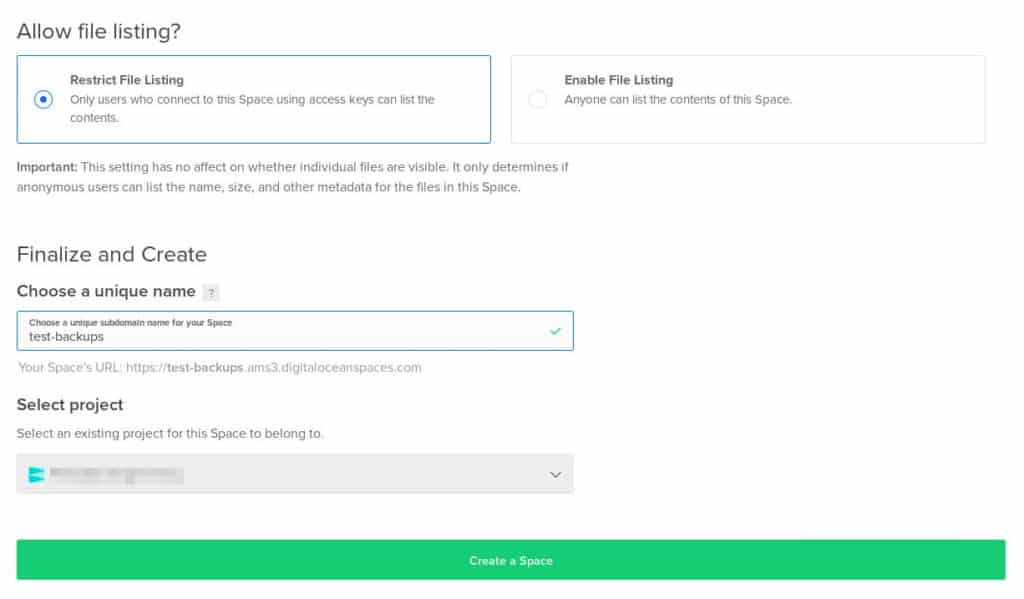
Click Create a Space.
Then, go to Settings, and copy the Endpoint into the example-backup-secret.yaml file.
Note. S3_ENDPOINT must be base64 encoded.
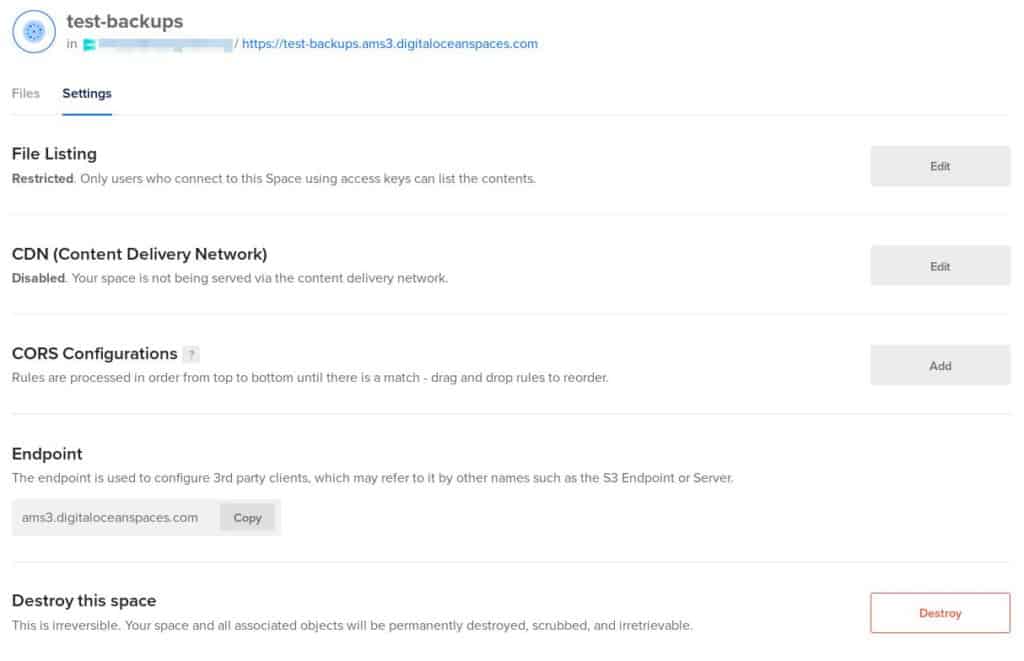
Now, you need to generate an access key for the Space.
Go to the dashboard, and select API from the menu: https://cloud.digitalocean.com/account/api/tokens
Click Generate New Key.

Choose a key name.

Then copy the key_id and the key into the example-backup-secret.yaml file.

On the first line is AWS_ACCESS_KEY_ID and on the second line is AWS_SECRET_KEY.
Make sure thatAWS_ACCESS_KEY_IDand AWS_SECRET_KEY are base64 encoded.
Afterwards, you can run this command line:
$ kubectl apply -f example-backup-secret.yaml
secret "my-cluster-backup-secret" created
Backups are stored on object storage services like S3 or Google Cloud storage. In order to be able to store backups, the secret defined under backupBucketSecretName must use credentials to store those backups.
To do that, you have to setup your backups to Google Cloud where you need a storage bucket. For more information, learn how to create a storage bucket.
Requesting a backup is easy. You just need to create a file named example-backup.yaml and copy into it the following YAML code:
apiVersion: mysql.presslabs.org/v1alpha1
kind: MysqlBackup
metadata:
  name: my-cluster-backup
spec:
  clusterName: my-cluster
Run the following command:
$ kubectl apply -f example-backup.yaml

mysqlbackup.mysql.presslabs.org "my-cluster-backup" created
You need to specify the backupBucketUri for the corresponding cluster to an URI like gs://BUCKET_NAME and backupSecretName. Open the file named example-cluster.yaml and copy it into the following YAML code:
apiVersion: mysql.presslabs.org/v1alpha1
kind: MysqlCluster
metadata:
  name: my-cluster
spec:
  replicas: 2
  secretName: my-secret
  backupSecretName: my-cluster-backup-secret
  backupUri: gs://pl-test-mysql-operator/
Then run the following command:
kubectl apply -f example-cluster.yaml
mysqlcluster.mysql.presslabs.org "my-cluster" configured
To list all backups, use the kubectl get command to return a list of the backups.
$ kubectl get mysqlbackup

NAME                AGE
my-cluster-backup   55s
To check the backup state, use kubectl describe command:
$ kubectl describe mysql my-cluster

...
Status:
  Backup Uri:  gs://pl-test-mysql-operator/
  Completed:   false
  Conditions:
    Last Transition Time:  2018-08-17T08:08:31Z
    Message:               First initialization of backup
    Reason:                set defaults
    Status:                Unknown
    Type:                  Complete
...
And voilà, you’ve got a brand new MySQL cluster on the freshly launched Digital Ocean Kubernetes! Well done!
